解答例 - 実習課題2 - 5.レイアウト・マネージャー2
(実習課題2)
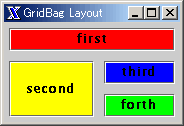
以下のウィンドウを表示するプログラムを作成しなさい。
- ウィンドウ内のコンポーネントは「JButton」のみ。
- レイアウトマネージャーは「GridBagLayout」。
- (ヒント)「java.awt.Insets」クラスを使用する。コンストラクタの引数の値は全て5。
解答例
package com.techscore.ui.chapter5.exercise2;

/**
 * GridLayoutFrame.java
 * TECHSCORE Javaユーザインタフェース5章 実習課題2
 *
 * Copyright (c) 2004 Four-Dimensional Data, Inc.
 */

import java.awt.Color;
import java.awt.GridBagConstraints;
import java.awt.GridBagLayout;
import java.awt.Insets;

import javax.swing.JButton;
import javax.swing.JFrame;

public class GridBagLayoutFrame extends JFrame {

    public GridBagLayoutFrame() {
        super("GridBag Layout");
        setDefaultCloseOperation(EXIT_ON_CLOSE);

        //GridBagLayoutの作成
        GridBagLayout layout = new GridBagLayout();
        getContentPane().setLayout(layout);

        GridBagConstraints c = new GridBagConstraints();
        c.insets = new Insets(5, 5, 5, 5);

        //ボタンを4つ配置

        JButton first = new JButton("first");
        first.setBackground(Color.red);
        c.gridwidth = 2;
        c.fill = GridBagConstraints.HORIZONTAL;
        layout.setConstraints(first, c);
        getContentPane().add(first);

        JButton second = new JButton("second");
        second.setBackground(Color.yellow);
        c.gridwidth = 1;
        c.gridy = 1;
        c.gridheight = 2;
        c.fill = GridBagConstraints.VERTICAL;
        layout.setConstraints(second, c);
        getContentPane().add(second);

        JButton third = new JButton("third");
        third.setBackground(Color.blue);
        c.gridheight = 1;
        c.gridx = 1;
        c.gridy = 1;
        layout.setConstraints(third, c);
        getContentPane().add(third);

        JButton forth = new JButton("fourth");
        forth.setBackground(Color.green);
        c.gridx = 1;
        c.gridy = 2;
        layout.setConstraints(forth, c);
        getContentPane().add(forth);

        pack();
    }

    public static void main(String args[]) {
        new GridBagLayoutFrame().setVisible(true);
    }

}